Main Window
Power CD+G Burner Window
Power CD+G Burner operates in four modes. Click below to learn mode about each of the modes.
BURN
Burn mode
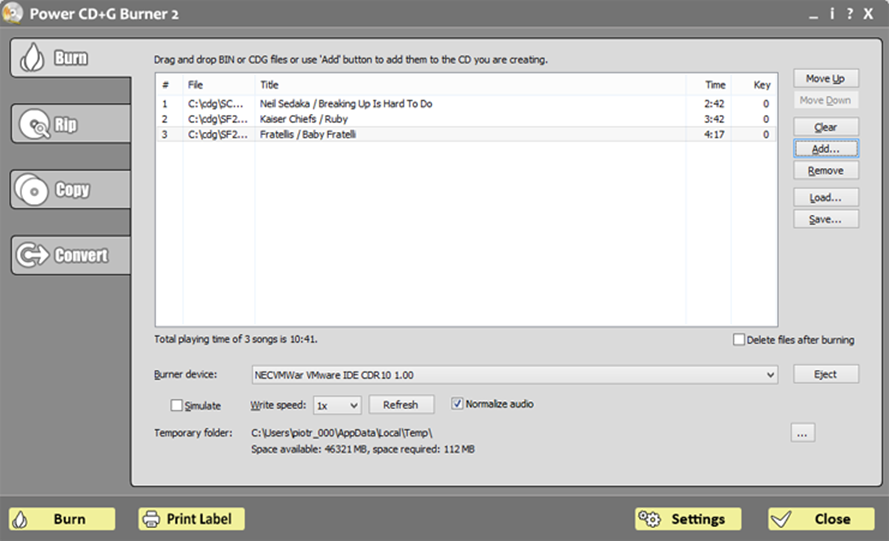
The main window of Power CD+G Burner gives you full control over the burning process.
File list
Use this list to arrange songs on a CD. You may add songs (CDG and BIN) by dropping the on Power CD+G Burner window or by using Add button. Add button allows you to add several file at once.
Note: Unregistered version of Power CD+G Burner allows only 5 tracks per CD. Full version does not have this limitation.
Move Up and Move Down buttons allow to move the track up and down the track list.
Delete files after burning can be used when burning temporary files -- Power CD+G Burner will delete the files after burning.
To change the key of the song on the list right-click it, select Change Key command and enter a value in semitones to modify the key of the song. It is possible to change up to 12 semitones
Normalize
This option allows to maximize peak volume of all tracks so that no adjustments between tracks are needed during playback.
Burner device settings
Here you can select which burner device should be used and choose the burning speed.
We recommend burning with lowest speed possible (this is the default setting), as some CD+G players will not play properly CDs burned with higher settings.
If you insert the CD-R disc after starting Power CD+G Burner, you may need to use Refresh button to update available burn speeds.
Simulate checkbox allows to test burn process.
Temporary folder settings
Power CD+G Burner creates intermediate image file before the CD is actually written. This file may be up to 800 MB (it depends on the total playing time of the CD), so you need to ensure that there is enough free space on the disc.
By default Windows temporary folder is used.
Print Label
Print Label dialog box allows to print jewel case inlays for the current disc.
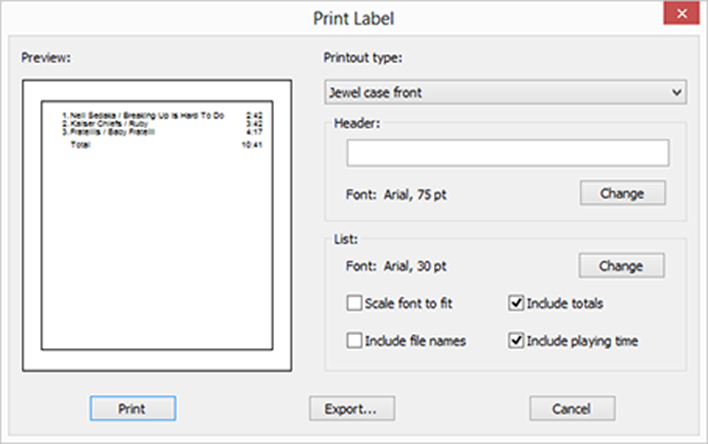
You may select the printout type (jewel case front, jewel case back, or list).
Header will be displayed on the top of the song list, you may adjust the font used for the header.
List section allows to select which items should be included in the printout.
Export allows to export the song list to the text file.
RIP
Rip mode
Reader device
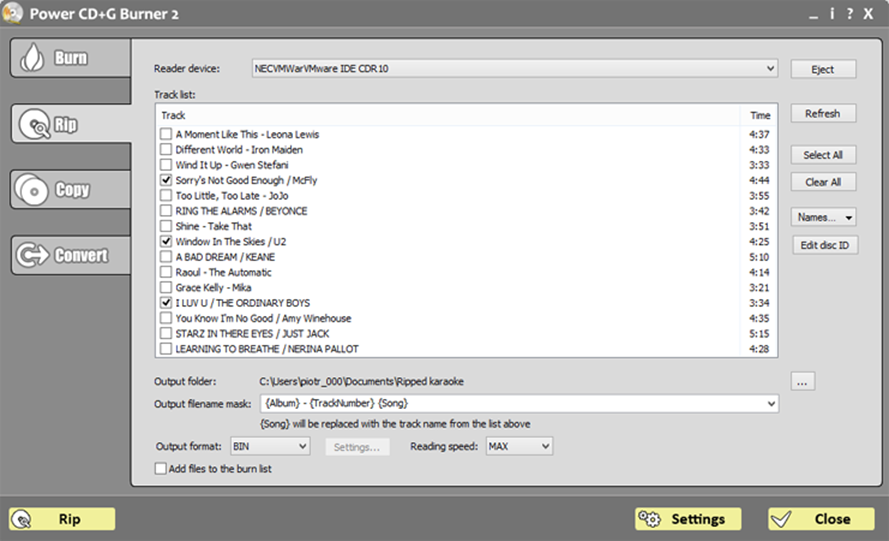
Select one of the CD-ROM devices available on your computer.
Track list
Use checkboxes to select tracks to save on a hard disc. Use Refresh button to read a new CD. Use Select All and Clear All button to control the selection.
Double-click the item or click Edit button to edit song title.
Output folder
Power CD+G Burner will save CD+G tracks in this folder. Use [...] button to change the folder.
Output filename mask
Power CD+G Burner will save tracks using the name you specify in this field.
- {Song} will be replaced with track name, so if you define 'CD1 - {Song}' as a filename mask, files 'CD1 - Track 01.bin', 'CD1 - Track 02.bin', etc. will be created. If track name is retrieved from FreeDB server, this will be usually artist name and song title.
- {Album} will be replaced with the album name retrieved from FreeDB server.
- {TrackNumber} will be replaced with the track number (with a leading 0 for tracks 01 - 09).
- {Artist} will be replaced with artist name (artist name has to be separated by '/' [slash] from track title)
- {Title} will be replaced with title (title has to be separated by '/' [slash] from artist name)
Note: to use {Artist} and {Title} markers each track name needs to be of the following format:
Artist name / Song title
Most FreeDB entries follow this rule.
Output format
You may choose one of 3 output formats:
- BIN - single uncompressed file with both audio and graphics. Best for copying.
- CDG+MP3 (also known as MP3+G) - two files (.CDG and .MP3) will be created. CDG file contains graphical information, while MP3 file contains the soundtrack. Use Settings button to adjust MP3 compression details.
- CDG+WAV - as above, only uncompressed WAV files will be used for audio.
- ZIP - compressed CDG+MP3
If Add files to the burn list is checked, Power CD+G Burner will automatically add the ripped files to the burn list (useful when making compilations).
COPY
Copy mode
Reader device
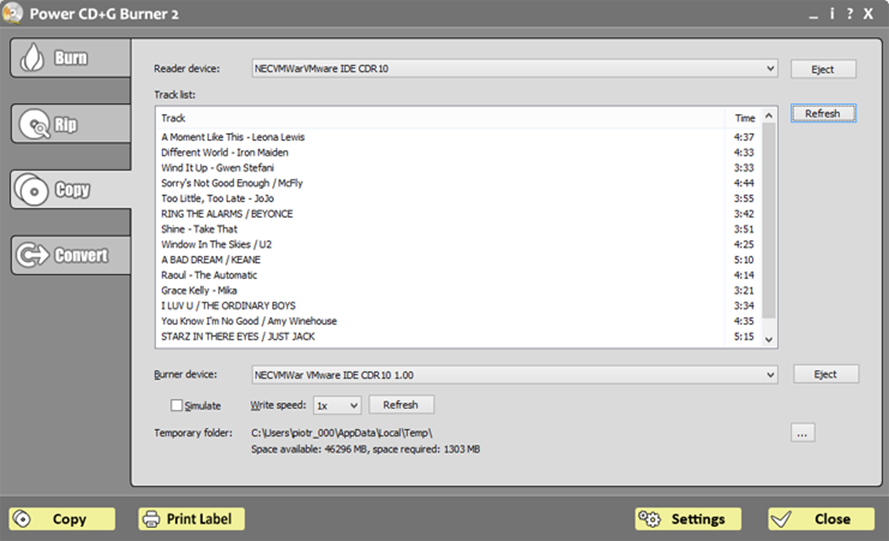
Select one of the CD-ROM devices available on your computer.
Track list
Power CD+G Burner will display tracks from the CD in reader drive. Use Refresh button to read a new CD.
Burner device settings
Here you can select which burner device should be used and choose the burning speed.
We recommend burning with lowest speed possible (this is the default setting), as some CD+G players will not play properly CDs burned with higher settings.
If you insert the CD-R disc after starting Power CD+G Burner, you may need to use Refresh button to update available burn speeds.
Simulate checkbox allows to test burn process.
Temporary folder settings
Power CD+G Burner creates intermediate image file before the CD is actually written. This file may be up to 800 MB (it depends on the total playing time of the CD), so you need to ensure that there is enough free space on the disc.
By default Windows' temporary folder is used.
CONVERT
Convert mode
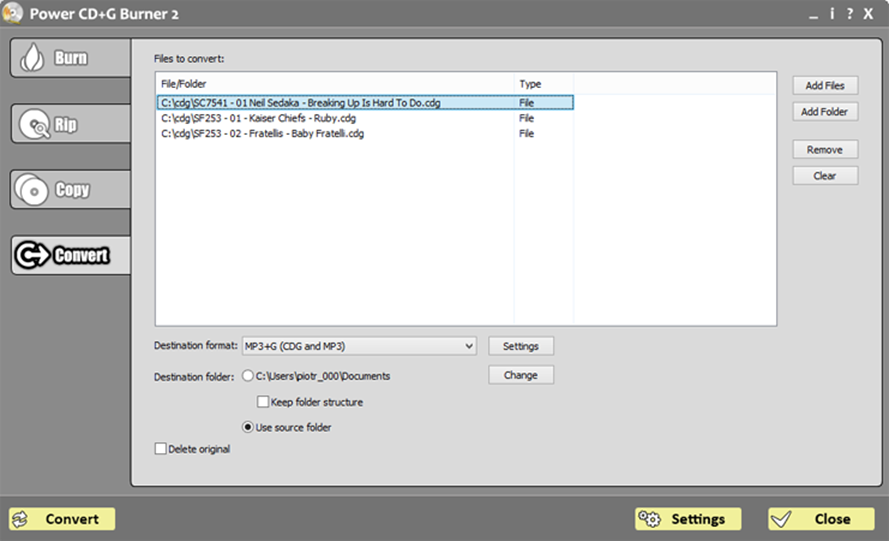
This mode allows to convert between various karaoke file formats.
Allowed input formats are:
- BIN
- MP3+G
- ZIP
- KMA
Power CD+G Burner automatically detects input format based on file extension.
Output formats are:
- BIN
- MP3+G
- ZIP
Files to convert list displays the list of the files that will be processed. There are three ways to populate the list:
- Add files using Add button: this allows to add one or more file from a single folder.
- Add entire folder and subfolders with Add Folder button: you may select the folder, choose to include subfolders (displayed as Recursive), and define which file extensions should be taken into account
- Drag and drop files onto Power CD+G Burner window
Destination folder defines where will the files be written to. You may output the files to the same folder as the source files, or you may choose a different folder. Checking Keep folder structure will retain the folder tree when processing folders with subfolders.
Delete original will cause the original file to be deleted after converting has succeeded.